Table of Contents
- 5.1. Installing Fanurio
-
- 5.1.1. Requirements
- 5.1.2. Setting up Fanurio for the first time
- 5.1.3. Upgrading from the standalone version to the server version
- 5.1.4. Running Fanurio over SSL (HTTPS)
- 5.1.5. Whitelisting trusted IPs
- 5.1.6. How synchronization works in client mode
- 5.1.7. Changing the server address in client mode
- 5.1.8. Changing the password
- 5.1.9. Permissions
- 5.1.10. Registering a license key
- 5.1.11. Importing data from other applications
- 5.1.12. Installing Fanurio on a USB stick
- 5.1.13. Uninstalling Fanurio
- 5.2. User data
-
- 5.2.1. Location
- 5.2.2. About repositories
- 5.2.3. About backups
- 5.2.4. Creating and restoring backups
- 5.2.5. How single users can sync data between multiple computers
- 5.2.6. Exporting the log file
- 5.2.7. Changing settings manually
- 5.2.8. Translating to other languages
- 5.2.9. Installing a custom language file
- 5.2.10. Password encryption
- 5.3. Known issues
- 5.4. More help
Fanurio runs on Windows (including Windows 8.1), Mac OS X (10.5 or later, including Mavericks), Linux (including Debian-based distributions like Ubuntu) and other flavors of Unix.
Ubuntu (.deb installer)
Ubuntu comes installed with OpenJDK but we recommend using Oracle Java instead. Follow these steps to install it after you open a Terminal window:
-
Download the tar.gz file for Linux from Oracle.
This guide assumes the file is called jdk-7-linux-i586.tar.gz but depending on which version you decide to download, it may have a different name.
-
Untar and copy it to /usr/lib/jvm/ where Java is installed. The new Java launcher will be /usr/lib/jvm/jdk1.7.0/jre/bin/java.
sudo tar -zxvf ~/Downloads/jdk-7-linux-i586.tar.gz -C /usr/lib/jvm/
-
Add the new Java installation to the Java alternative lists.
sudo update-alternatives --install /usr/bin/java java /usr/lib/jvm/jdk1.7.0/jre/bin/java 1
-
Make the new Java installation the default one. Run the following command and choose the option that points to the new Java installation.
sudo update-alternatives --config java
-
Test it.
java -version
When you start Fanurio for the first time, it needs to determine if you will be using the standalone version or the server version. It does this by asking whether you have a license key or not.
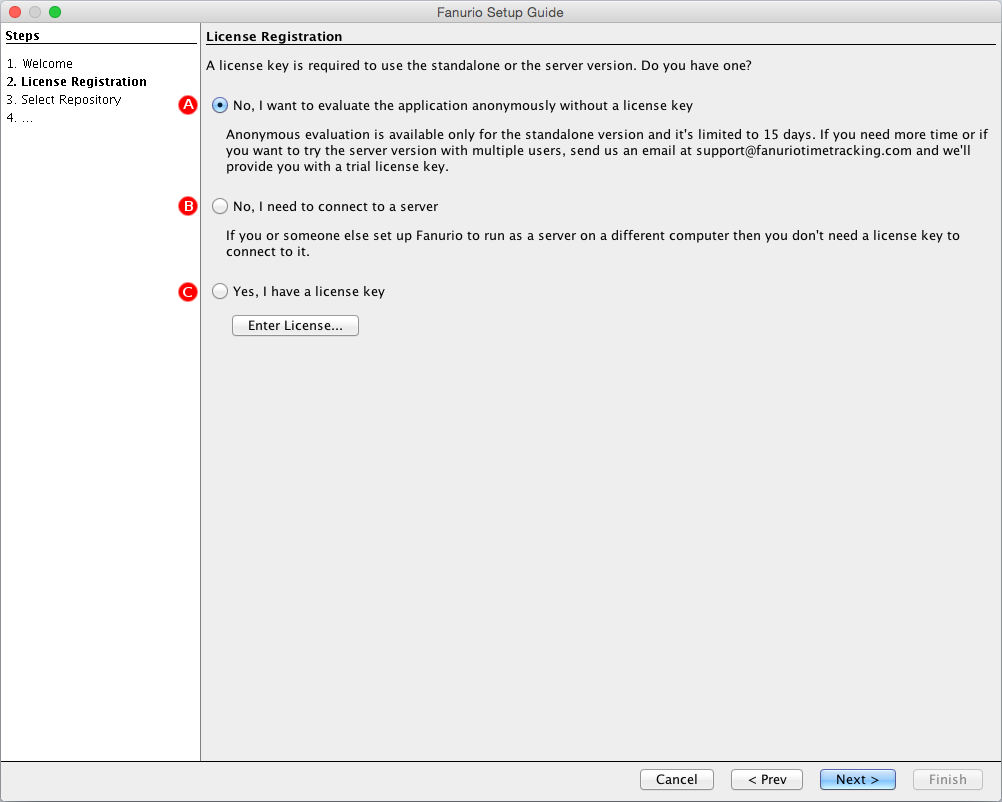 |
Fanurio Setup Guide - License Registration
If you want to use the standalone version, you can either try it anonymously for 15 days without a license key (option A) or register a standalone license key (option C). You can get a license key either by purchasing a standalone license or by requesting a trial extension.
The setup guide will then help you create a new repository for your data or use an existing one.
-
If you don't have a repository, leave the "Yes, I'm a new user and I don't have one" option selected. Fanurio will help you create a new repository and configure your business. Once you create the repository, you can change your business settings from .
-
If you already have a repository, select "No, I already have one". This option makes sense if you share the repository through Dropbox so you can use it on multiple computers.
Once the setup is completed, you may want to review the default settings (timer reminders, language, etc).
-
Go to to access the settings on Windows
-
Go to to access the settings on Mac
-
Go to to access the settings on Linux
If you want to use the server version, you first need to decide which computer will run the server and which computers will connect to the server.
-
On the computer that runs the server, you need to register a server license key (option C). You can get a license key either by purchasing a server license or by requesting a trial key.
The setup guide will then help you create a new repository for your data. It will also ask you to create a user so you can log in after the setup is completed.
After logging in for the first time, go to to add or invite more people.
Then go to to see the address of your server and copy it. Users will need this address to connect to the server from other computers.
Finally, go to to start the server.
-
On the other computers, you need to tell Fanurio that you want to connect to a server (option B).
The setup guide will then finish and you will be able to log in to a server. To log in, you will need to ask the server administrator for the server address and your access details (username and password).
The server must be online when you log in for the first time because Fanurio needs to make a local copy of your data. After that, the server doesn't have to be online for you to log in again but it must be online if you need to synchronize local changes.
Once the setup is completed, you may want to review the default settings (timer reminders, language, etc).
-
Go to to access the settings on Windows
-
Go to to access the settings on Mac
-
Go to to access the settings on Linux
When upgrading from the standalone version to the server version, you first need to decide which computer will run the server and which computers will connect to the server.
-
On the computer that runs the server, you need to register your new license key. If your repository is open, Fanurio will close it and switch to server mode.
Since the server version can handle multiple users, you need to log in to access the repository. By default, a standalone repository has one user called Admin. To log in for the first time, use the admin username and leave the password field empty. Once logged in, you can change the name and password from .
Next, go to to add or invite more people.
Then go to to see the address of your server and copy it. Users will need this address to connect to the server from other computers.
Finally, go to to start the server.
-
On the other computers, you need to tell Fanurio that you want to connect to a server. To do this, go to and select "No, I need to connect to a server". If your repository is open, Fanurio will close it and switch to client mode.
To log in, you will need to ask the server administrator for the server address and your access details (username and password).
The server must be online when you log in for the first time because Fanurio needs to make a local copy of your data. After that, the server doesn't have to be online for you to log in again but it must be online if you need to synchronize local changes.
A Fanurio server can encrypt communications to and from clients with SSL to protect your data from being intercepted by others. To do this, it needs to be configured with a keystore that contains your SSL certificates. Here's how to do it:
-
Go to
-
Check Enable SSL
When you enable SSL, the server can only be accessed over HTTPS. Fanurio does not support both HTTP and HTTPS at the same time. If you have clients that connected to the server over HTTP, once you enable SSL they will have to connect over HTTPS (use the HTTPS address).
-
Locate the keystore file
If you don't have a keystore file, see the next section to learn how to create one. Fanurio supports only keystores in the JKS format.
-
Enter the keystore password
Just to be sure, Fanurio encrypts the keystore password when saves it in the settings file.
Before you learn how to create a keystore file to hold your SSL certificates so you can enable SSL for a Fanurio server, you need to understand the difference between CA-signed certificates and self-signed certificates:
-
CA-signed certificates
These are certificates that have been digitally signed by a Certificate Authority (CA).
A Certificate Authority is a third-party entity that issues digital certificates to organizations or individuals after verifying their identity. Many CAs simply verify the domain name and issue the certificate, whereas others verify the existence of your business, the ownership of your domain name, and your authority to apply for the certificate, providing a higher standard of authentication. See this page for a list of CAs.
CA-signed certificates are recommended for production servers.
-
Self-signed certificates
These are certificates that have not been digitally signed by a Certificate Authority (CA).
A self-signed certificate is an identity certificate that is signed by the same entity whose identity it certifies. This term has nothing to do with the identity of the person or organization that actually performed the signing procedure. In technical terms a self-signed certificate is one signed with its own private key. If a server uses a self-signed certificate, a warning is displayed when you're connecting to it informing you that its identity was not verified by a trusted authority.
Self-signed certificates are recommended for test and internal servers.
This section shows how to create both types of certificates.
About Java keytool
To generate a keystore, you need a JDK installed and the keytool utility on your PATH. You can verify this setup by typing keytool at the shell prompt. You should see a list with all the keytool commands, similar to this:
$keytool
Key and Certificate Management Tool

Commands:

 -certreq            Generates a certificate request
 -changealias        Changes an entry's alias
 -delete             Deletes an entry
 -exportcert         Exports certificate
 -genkeypair         Generates a key pair
 -genseckey          Generates a secret key
 -gencert            Generates certificate from a certificate request
 -importcert         Imports a certificate or a certificate chain
 -importpass         Imports a password
 -importkeystore     Imports one or all entries from another keystore
 -keypasswd          Changes the key password of an entry
 -list               Lists entries in a keystore
 -printcert          Prints the content of a certificate
 -printcertreq       Prints the content of a certificate request
 -printcrl           Prints the content of a CRL file
 -storepasswd        Changes the store password of a keystore

Use "keytool -command_name -help" for usage of command_name
Creating a keystore with a self-signed certificate
To generate a private key and add it to a keystore, you need to use the genkeypair keytool command. The following command creates a keystore file called fanurio.jks in the current directory.
-
The "-ext SAN=..." option allows you to specify all the DNS names and/or IP addresses that will be allowed during hostname verification. In addition to localhost and 127.0.0.1, this example includes a LAN IP address 192.168.2.105 for the machine the server will be running on.
-
The -dname option contains the server identity, called the Common Name (CN), as well as other relevant information about your Organizational Unit (OU), Organization (O), Locality (L), State (S) and Country (C). If you are using a specific hostname for your server (e.g. fanurio.mydomain.com), use it in the CN field (e.g. CN=fanurio.mydomain.com ...).
-
The -keypass and -storepass options must specify the same password.
keytool -genkeypair -alias fanurio -keyalg RSA -keysize 2048 -keypass changeit -storepass changeit -validity 365 -keystore fanurio.jks -ext SAN=DNS:localhost,IP:192.168.2.105,IP:127.0.0.1 -dname "CN=localhost, OU=Development, O=Fanurio Time Tracking SRL, L=Craiova, ST=Dolj, C=RO"
You can verify its contents using the list keytool command:
keytool -list -v -keystore fanurio.jks
The resulting keystore file contains a self-signed certificate that can be used to configure your server.
Creating a keystore with a CA-signed certificate
To create a CA-signed certificate for your server, you need a self-signed certificate (read above). Then you need to follow these steps:
-
Generate CSR
First, you need to generate a Certificate Signing Request (CSR) for the CA to sign and confirm the identity of the certificate. To do so, issue the following command:
keytool -certreq -v -alias fanurio -file fanurio.csr -keystore fanurio.jks
It will create a file called fanurio.csr in your current directory.
-
Submit CSR to CA
Then you need to submit the contents of fanurio.csr to a CA for signing. They will provide a signed certificate (CA reply) and a set of root/intermediate CA certificates that you need to import in the keystore.
If you want to create CA-signed certificate for tests, you can get a free trial certificate from Comodo.
-
Import root certificate from CA
The following command imports the root certificate provided by the CA to your keystore. It expects the root certificate to be saved in a file called root-cert.pem.
keytool -importcert -v -noprompt -trustcacerts -alias cacert -file root-cert.pem -keystore fanurio.jks
-
Import signed certificate (CA reply)
The following command imports the signed certificate provided by the CA to your keystore. It expects the signed certificate to be saved in a file called signed-cert.pem.
keytool -importcert -v -alias fanurio -file signed-cert.pem -keystore fanurio.jks
The keystore file now contains a CA-signed certificate that can be used to configure your server.
Setting up a list of trusted IP addresses (whitelist) allows you to control the IPs from which the server can be accessed. This is an optional security measure that should be used with care because you risk blocking access for your users especially if they need to connect to the server from dynamic IP addresses.
To whitelist IP addresses:
-
Go to and then
-
Click on the tab.
Once enabled, you need to enter one or more IP addresses (e.g. 192.168.2.105) or ranges of IP addresses (e.g. 192.168.2.105/24) separated by commas. Wildcards are not supported for IP addresses while ranges of IP addresses must be provided in Classless Inter-Domain Routing (CIDR) notation.
You can use a CIDR calculator to see the IP address range.
When using the server version, Fanurio allows users to work on their projects even if the server is not online. This is possible because Fanurio keeps a local copy of their data. This feature is especially useful when working outside the office where the server may not be available.
When a user makes some changes, they are first recorded locally and then they are sent to the server. Fanurio also makes sure the local copy is up to date in case new changes are recorded on the server. The local repository and the server repository are kept identical through synchronization, either manual or automatic.
Manual synchronization can be performed from , by pressing the F9 shortcut or by clicking the synchronization button from the toolbar.
Manual synchronization is rarely needed because Fanurio can also perform automatic synchronization as follows:
-
On login
Fanurio synchronizes the client with the server when a user logs in so that the local repository has the latest changes available on the server.
-
After each local change
Fanurio sends local changes to the server as they are made. Instead of synchronizing each individual change immediately, Fanurio waits for 5 seconds to see if multiple changes are made and only then it sends them to the server.
-
Periodically
Fanurio synchronizes the client with the server periodically at 2 AM, 8 AM, 2 PM, and 8 PM so that the local repository has the latest changes available on the server.
For experts: Just in case you want to configure Fanurio to synchronize more often, you need to change the following setting manually. This example shows how to synchronize every hour. When specifying new synchronization patterns, make sure you test them first.
synchronization.scheduled.pattern=0 0 0/1 * * ?
If the server is not online or if the synchronization fails for some other reason, the synchronization icon from the toolbar shows a red badge with an exclamation point.
Conflict resolution
Fanurio resolves all synchronization conflicts automatically by using a "server wins" strategy. For instance, if the description of a project changes both locally and on the server, the server description will be replace the local description when the next synchronization is performed.
The best strategy to avoid conflicts is to sync often with the server or make sure Fanurio can sync automatically with the server. That's why Fanurio will show a warning message if you don't sync for more than a day.
Servers rarely change their address but if that happens and you're running Fanurio in client mode, go to to update it.
The server address may change for one of the following reasons:
-
The IP address of the server has changed.
-
The port number has changed.
-
The protocol has changed (e.g. http:// to https://).
The server administrator should inform you about such changes and about the new address. If the server has a different address (IP/URL) then you will no longer be able to synchronize your local changes with the server until you update it.
IMPORTANT: If the new address points to a different server (unlikely), the local repository will not be able to synchronize with the server. The new address must point to the same server.
On the server:
-
Go to to change your password.
-
Go to to change the password of other users.
On the client:
-
Click the Can't access your account? link on the login screen.
-
Enter the email address associated with your account and click .
-
Check your email for a link to reset your password.
Note: Passwords can be reset only if the server administrator has configured a notification email account under . Password reset emails are sent from this email account.
Note: Password reset links are valid by default for 15 minutes. As a server administrator, you can change this setting manually. The following example changes it to 30 minutes.
server.password.reset.token.lifetime.minutes=30
Fanurio determines what users can and cannot access based on the role assigned to them and the projects they are assigned to.
There are four possible roles a person can have in Fanurio, each with their own level of permissions.
Table 5.1. Roles
| Role | Description |
|---|---|
| Admin |
Admins have access to all the data with no restrictions. Some features are not available to Admins when accessing Fanurio in client mode. Admins can perform the following actions only on the server to protect sensitive data like passwords:
The user created when setting up Fanurio for the first time has the Admin role by default. Also, the default user created when upgrading from the standalone version to the server version has the Admin role. |
| Manager |
Managers are similar to co-workers with a few exceptions:
This role is ideal for people who need to manage a group of other people on their projects. |
| Co-worker |
Co-workers can access only projects assigned to them. Co-workers can see all project records, including those of other users. They can update and delete only their own records if they were not invoiced. Co-workers are not allowed to see or change any billing details. This includes invoices, payments, deposits, taxes, catalog items, products, trip rates and billing settings available on clients, projects, tasks, task categories, time entries, expenses, expense categories, and trips. This role is ideal for members of a team who need to work together on the same project. |
| Individual |
Individuals are similar to co-workers with a few exceptions:
This role is ideal for people who don't need to collaborate with others on their projects. |
The following table outlines these roles and what they're allowed to do:
Table 5.2. Roles and permissions
| Permission | Admin | Manager | Co-worker | Individual |
|---|---|---|---|---|
|
Billing |
||||
| Manage invoices, payments, deposits, taxes, catalog items, products, and trip rates | + | |||
| View billing settings for businss, clients, projects, tasks, task categories, time entries, expenses, expense categories, and trips | + | |||
|
People |
||||
| Manage people and invitations | + | |||
| View other people (only names, no other details) | + | + | + | + |
| Update their account (name and password) | + | + | + | + |
|
Business |
||||
| Update settings | + | |||
| View currencies (for expenses) and the default distance unit (for trips) | + | + | + | + |
|
Task categories and expense categories |
||||
| Manage categories | + | |||
| View categories | + | + | + | + |
|
Clients |
||||
| Manage clients | + | |||
| View assigned clients (only names, no other details) | + | + | + | + |
|
Projects |
||||
| Manage projects | + | |||
| Move projects | + | |||
| Assign projects to others | + | + | ||
| Grant and revoke project access | + | + | ||
| View members of assigned projects | + | + | + | |
| View assigned projects | + | + | + | + |
|
Tasks |
||||
| Manage tasks of other users | + | |||
|
Manage their own tasks Tasks created by users without billing permissions are saved as billable on the server if they are added to a billable project where tasks are billable by default (). The billing settings of a new task are either the billing settings of its category if the task uses a billable task category or the billing settings of its project. |
+ | + | + | |
| View tasks from assigned projects | + | + | + | + |
|
Time, Expenses, Trips |
||||
| Manage records of other users | + | |||
| View records of other users | + | + | + | |
|
Manage their own records Note: Records created by users without billing permissions are saved as billable on the server if:
|
+ | + | + | + |
Roles with limited access work with a partial copy of the data available on the server. For instance, tasks are downloaded without their billing settings by users who don't have billing permissions. This ensures that sensitive information like billing details or personal information remains protected.
Admins can assign or change the role of other users from (available only in server mode).
When the role of a user is changed, Fanurio notifies the user about it the first time he or she connects to the server to synchronize their data. When that happens, Fanurio also resets the local repository to download the data the user is allowed to access.
If there are any local changes that haven't been synchronized, Fanurio exports them to disk so they can be reviewed manually. Since reviewing local changes manually can be a laborious process, admins should ask their users to synchronize local changes before changing their role. If a user hasn't synchronized their changes, admins can revert their role temporarily so they can synchronize them.
Admins can grant and revoke project access to other users in two ways:
-
Edit the project (right-click the project and select Edit Project from the contextual menu) then add the person as a member of that project or
-
Go to and double click a person to change the projects assigned to them.
When access to a project is granted or revoked to a user, Fanurio notifies the user about it the first time he or she connects to the server to synchronize their data.
Fanurio needs a license key to know whether you have licensed the standalone version or the server version. The license key also tells it which updates you are allowed to use. That's why you need to register a new license key each time you renew your annual maintenance plan.
If you have licensed the server version, the license key tells it how many people are allowed to use the application. You need to register the license key only on the server, not on each client.
Here's how to register a license key:
-
Save the license file you received by email (license.dat) on your Desktop.
IMPORTANT: Don't try to open the license file as there is nothing meaningful in there. Just save it on your computer. Fanurio knows how to read its contents.
-
Go to to open the License Registration dialog.
-
Click the Enter License... button to select the license key.
-
Click the Browse button to locate the license file on your Desktop.
-
Enter the email address where you received the license file in the Email field.
-
Click OK to confirm the selection.
-
-
Click OK to register the license key.
Fanurio can import the following data to help you get started faster:
-
Clients from a CSV file and from Apple Contacts.
-
Time from a CSV file, from iCalendar files and from QuickBooks.
-
An iBiz database.
If you need to import something that Fanurio can't handle, please contact us and we'll try to help you get your data into Fanurio.
You can install Fanurio on a USB stick and run it from there on any computer, whether it uses Windows, Linux or Mac OS X. You may want to do this if you work on your client’s computer and you don’t want to install Fanurio there.
The cross-platform version requires Java 6 or higher. If Java is not installed on your computer, you can download the latest version from java.com.
Here's what you need to do:
-
Download the cross-platform version (.tar.gz)
-
Install it on the USB stick by unzipping it
-
Launch it using:
-
fanuriolocal.applescript on Mac OS X
-
fanuriolocal.exe on Windows
-
fanuriolocal.sh on Linux and other flavors of Unix
-
Note: It's important to start Fanurio using the local scripts. The other scripts (without local in their name) will start Fanurio but will not keep the data on the stick.
Please follow these steps to uninstall Fanurio from your computer. If you've had problems using it, we would appreciate it if you could tell us more about it.
-
Mac OS X
In the Finder sidebar, click Applications. Drag the app from the Applications folder to the Trash (located at the end of the Dock), then choose Finder > Empty Trash.
If you change your mind, before emptying the Trash, select the app in the Trash, then choose File > Put Back.
-
Linux
If you're using Ubuntu, open Ubuntu Software Center and search for fanurio. Then click the Remove button.
On other Debian-based distributions, open a Terminal window and run the following command:
sudo apt-get remove fanurio
-
Windows 10
-
Open the Start menu.
-
Click Settings.
-
Click System on the Settings menu.
-
Select Apps & features from the left pane.
-
Select an app you wish to uninstall.
-
Click the Uninstall button that appears. If it is grayed out, this is a system app you cannot remove.
-
Click the Uninstall pop-up button to confirm.
-
-
Windows 8.1
-
Point to the upper-right corner of the screen, move the mouse pointer down, and then click Search.
-
Enter control panel in the search box, and then click Control Panel.
-
Under View by:, select Large Icons, and then click Programs and features.
-
Click the program, and then click Uninstall.
-
Follow the instructions on the screen.
-
-
Windows 7 and Vista
-
Open Programs and Features by clicking the Start button, clicking Control Panel, clicking Programs, and then clicking Programs and Features.
-
Select a program, and then click Uninstall.
-
-
Windows XP
-
Click Start, click Control Panel, and then double-click Add or Remove Programs.
-
In the Currently installed programs box, click the program that you want to remove, and then click Remove.
-
If you are prompted to confirm the removal of the program, click Yes.
-
-
Cross-platform
Delete the fanurio folder. Please make sure you backup all data from the local subfolder first.
|
Copyright © 2006-2017 Fanurio Time Tracking SRL |