Table of Contents
- 6.1. Setting up a server
- 6.2. Accessing a server from the desktop
- 6.3. Accessing a server from the web (experimental)
- 6.4. Managing access
- 6.5. Server settings
- 6.6. CLI command reference
- 6.7. Maintenance
The server version allows two or more people to collaborate on projects. Users have roles that can limit access to the projects assigned to them. Users can work on their projects even if the server is not online because all changes are recorded locally and synced with the server whenever it is available.
The server version can also be used by single users who need to work on multiple computers and have their work synced between them.
Before setting up a server, you first need to decide which computer will run the server and which computers will connect to the server. Once the server is up and running, see this page for more details on how to connect to it.
When running the server on a local network, it needs a fixed address for clients to access it. The easiest way to do that is to assign the server computer a static IP address on the local network.
Instead of using DHCP to assign the server computer an IP address dynamically, the IP address for the server must be entered manually. This can be done on both macOS (official, alternative) and Windows (official).
If the server computer doesn't have a fixed address and it changes, clients will not be able to connect and their server address will have to be updated.
Do this if you want to set up a new server, transfer an existing server to a new computer, or upgrade from standalone to server but on a different computer.
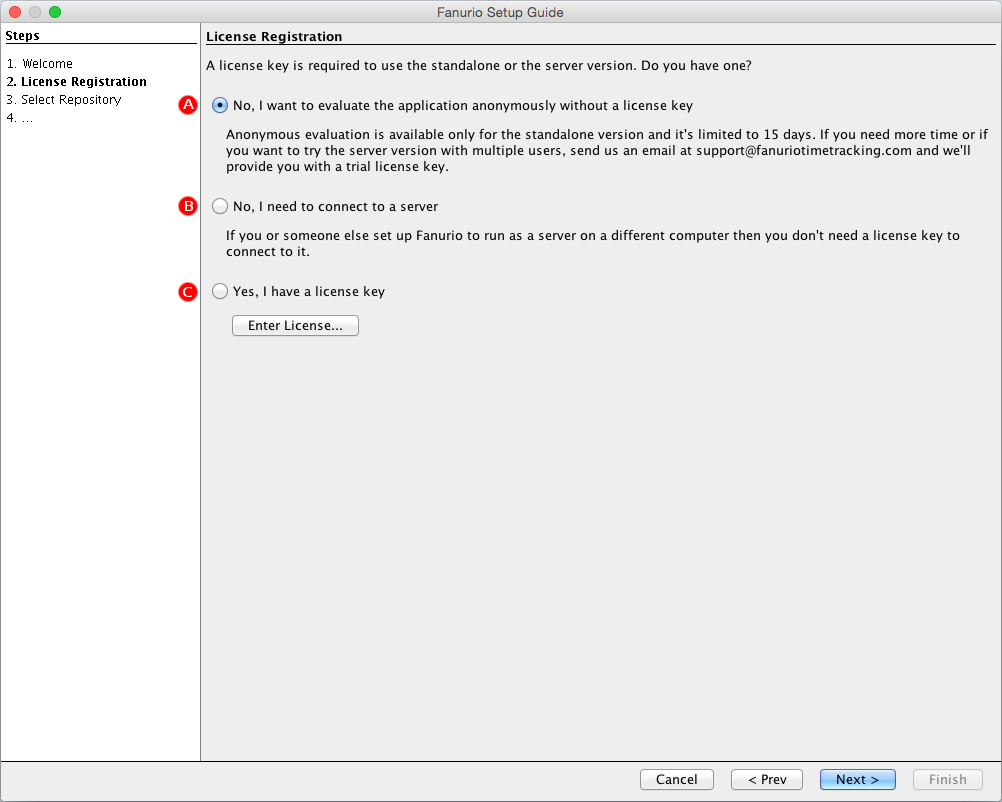 |
Fanurio Setup Guide - License Registration
-
Register server license
Start the application and register the server license key (option C) in the setup guide.
If you don't have a server license key, you can get one either by purchasing it or by requesting a trial key.
-
Create a repository
The setup guide will help you create a repository for your data. You can either:
-
Create a new repository in which case it will also ask you to create an Admin user so you can log in after the setup is completed or
-
You can restore a backup file. The backup file can be from a different server instance if you transfer an existing server to a new computer or from a standalone instance if upgrade from standalone to server but on a dedicated computer.
-
-
Log in as admin
Log in using your Admin username and password.
If you restored a backup file from the standalone version, use the admin username and leave the password field empty. By default, a standalone repository has one user called Admin that has the username admin and no password.
-
Review server settings
Go to to review the server settings. This includes the server port and address (you need this address to connect to the server from other computers) and whether SSL is enabled.
You can also configure email notifications so you can invite other users to create an account or allow them to reset their password by email.
-
Review users and permissions
If you have more than one user, go to to add or invite them. Then go to to assign people to projects.
See the permissions section for more details on what roles you can assign to your users.
-
Start server
Go to to start the server.
-
Access the server
See this section for more details on how to access the server from other computers.
Do this if you want to set up a new server, transfer an existing server to a new computer, or upgrade from standalone to server but on a different computer without a graphical user interface. See the reference page for a complete list of all CLI commands.
-
Register a license
Run the following command to register the license key:
./fanurio.sh --settings-update "license-email=john.doe@acme.com,license-file=license.dat"
-
Create a repository
Run the following command to create a new repository:
./fanurio.sh --repository-create "admin-name=Admin,admin-username=admin,admin-email=admin@acme.com,admin-password=123"
Run the following command to restore a backup copy if you need to transfer an existing server or upgrade from standalone to server:
./fanurio.sh --repository-restore /home/john/backup.fro
-
Review server settings
See the settings section for a complete list of all the server settings that can be made from the command line.
-
Review users and permissions
If you have more than one user, you can add them or change their roles.
See the permissions section for more details on what roles you can assign to your users.
-
Start server
Run the following command to start the server:
./fanurio.sh --server
-
Access the server
See this section for more details on how to access the server from other computers.
Do this if you want to continue to use the application on the same computer but also connect to it from other computers or if you need to have more than one user.
-
Register server license
Go to to register the new server license key. If your repository is open, Fanurio will close it and switch from standalone mode to server mode.
Unlike the standalone mode that is designed to be used by just one person, the server mode can handle more than one person. To identify the person using the app, it displays the login window even if only one person is registered.
-
Log in as admin
To log in for the first time, use the admin username and leave the password field empty. Once logged in, you can change the name and password from .
By default, a standalone repository has one user called Admin that has the username admin and no password.
-
Review server settings
Go to to review the server settings. This includes the server port and address (you need this address to connect to the server from other computers) and whether SSL is enabled.
You can also configure email notifications so you can invite other users to create an account or allow them to reset their password by email.
-
Review users and permissions
If you have more than one user, go to to add or invite them. Then go to to assign people to projects.
See the permissions section for more details on what roles you can assign to your users.
-
Start server
Go to to start the server.
-
Access the server
See this section for more details on how to access the server from other computers.
Note: If you want to upgrade from standalone to server but run the server on a different computer, you need to install the application on the new computer and transfer your standalone data there.
One way to access a server installed on a local network from the internet is to enable port-forwarding on your router. If you are not familiar with port-forwarding, this guide explains how it works and how to set it up on a router. Please take the time to read it.
In order to add a port forwarding rule to your router, you need to enter the Fanurio server IP address and port number. You can see them on the server by accessing Server | Server Settings from the menu. After you enable port-forwarding, your server will be available at the IP address assigned to you by your ISP (internet service provider). If you don't know it, you can see it here.
Here's what you need to consider before enabling port-forwarding:
-
SSL
If you plan to access the server from the internet, we highly recommend that you enable SSL to encrypt all communication between clients and server.
-
Static IP
If you don't have a static IP address (most likely), the internet address of your server may change and users will have to update it in order to access the server. If so, you should ask your ISP if you can get one.
You can also consider using a DDNS service to ensure the server address doesn't change.
-
Firewall
Make sure that your server's firewall allows incoming traffic on the server port.
Let's assume the address of your server on the local network is http://192.168.2.101:8111/ and the IP address assigned to you by your ISP is 10.10.10.10. In this case, the server will be available at http://10.10.10.10:8111/ from the internet and this address should be used when accessing the server from outside your local network. If SSL is enabled, the address from the above example changes to https://10.10.10.10:8111/.
|
Copyright © 2006-2024 Fanurio Time Tracking SRL |